
Lock Analysis
This page is somewhat unlike the others here although the format is the same. It's not so much a complete page covering a topic as it is a loose collection of mini-subjects. I intend to add more as time goes on and you should procede as if reading a diary or even a stream-of-consciousness. Anyway, the subject we will examine here is analyzing locking mechanisms. What is presented here is most relevant to high-security keyed mechanical locks, but maybe there are nuggets of insight into other systems. I'll toss around some examples, but primary purpose of this page is to get the reader thinking. My greatest wish is that someone will be giving this page a quick scan and think "Wait a sec, [high-sec lock] might have that problem!" and this would lead to a successful exploit. Keep in mind that much of the text here is pure opinion and random thought-material. The reader should also check out my Lock Mechanisms page for descriptions of some of the elements discussed here.
Reference Material
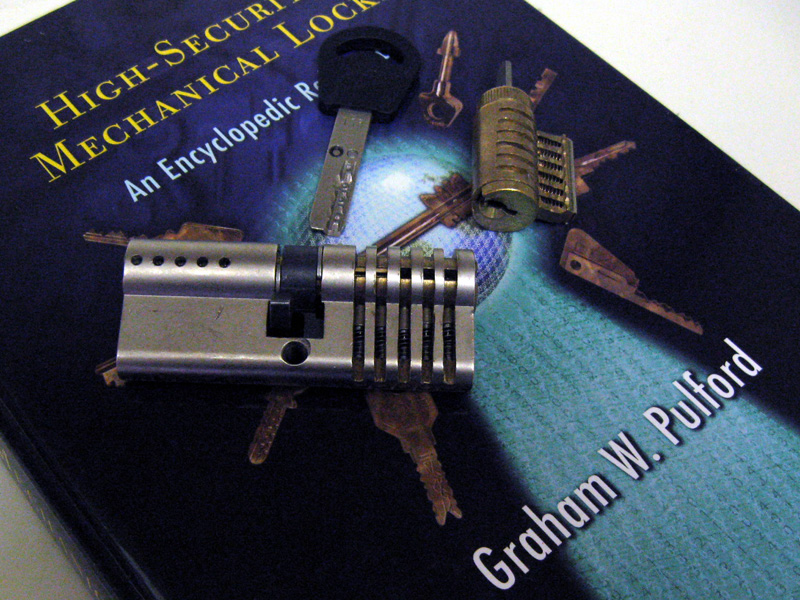
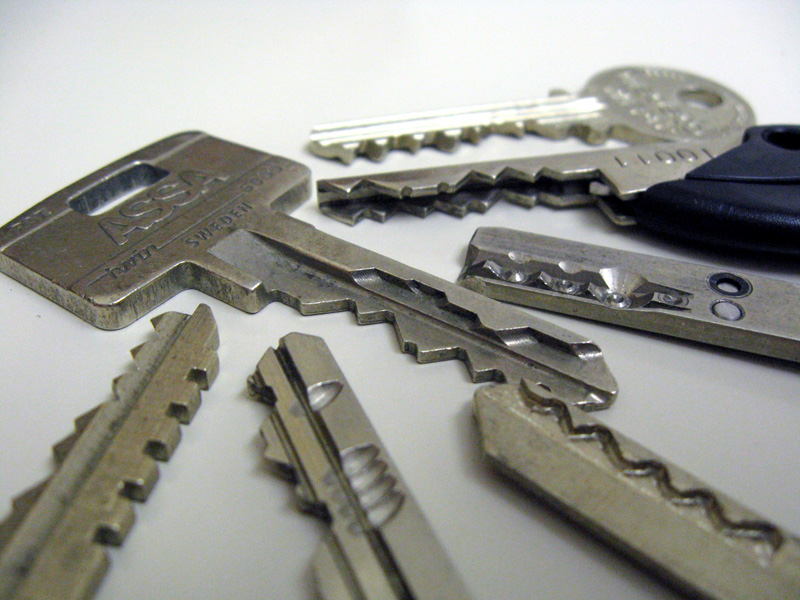
When examining a unique locking mechanism for the first time, it can be a challenge to merely understand how all of the parts move and interact. This is the first step to breaking down one of these mechanical puzzles. The best way to do this is to have the lock in hand along with an assortment of tools for disassembly. The next best thing is a cutaway model of the lock. Cutaways are locking mechanisms that have bits of them removed or modified so that parts of the action are visible. In lieu of or in addition to these aides, several pictures of the lock at various angles and stages of disassembly can be very helpful. Resolution is not nearly as important as variety in these cases. With too few images, you may find yourself asking "What does the backside of that part look like?", etc... Another item that helps dramatically is possessing several keys (or pictures of them at least).
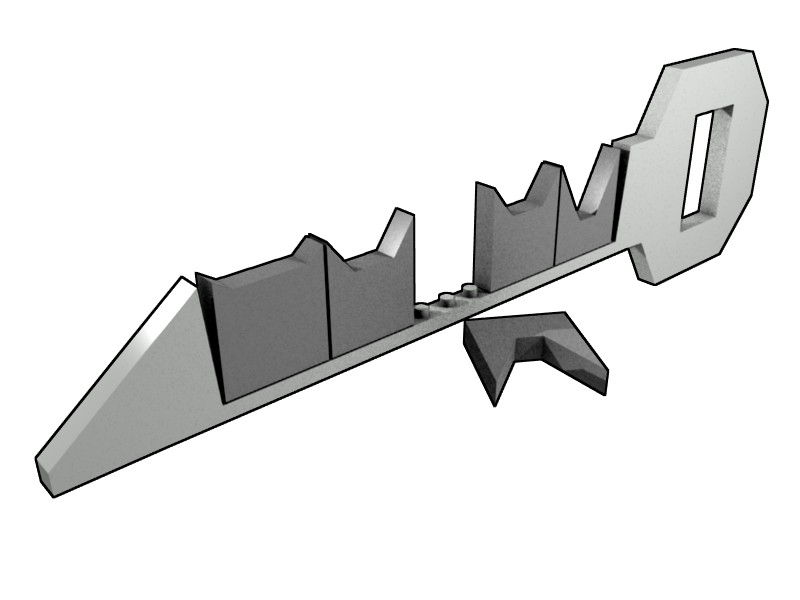
The Key
You should look at the lock from the perspective of the key. What is it doing exactly when it enters the lock? What actions are required to operate the mechanism on the part of the user? What happens when the key is withdrawn? Typically, only a small portion of the key's 3D shape is actually involved in operating the lock. Consider a plain-jane 5 pin tumbler lock; the only part that "matters" is the profile of the keyblade in one dimension. Of course, this keyblade must also be able to physically fit into the the keyway (this feature is called the keyway profile). Other aspects of the key such as material, length, thickness, etc.. become irrelevant. All that matters is that ramped surface being present under the pins at the time that tension is applied. A more extreme example can be found in warded locks. In these mechanisms, the key need only depress a small lever in the back of the keyway to release the latch. The bittings along the key serve only the hit protrusions in the keyway called wards. If the key were very slender with a little flag on the end to hit the lever, it would work in any lock of this type regardless of bitting.
The Lock
Another way to approach the problem of opening a unique lock without the key is from the point-of-view of the lock itself. A typical mechanism is designed to require a key to move certain elements to various positions. Assume that the lock is some sort of cylindrical design in which the plug rotating is the goal. Look for the actual elements that are blocking this action in a no-key situation. You should also examine which elements are directly blocking in the event of a blank key (a key with no cuts made). These blocking components could be sidebars, cylindrical pins, flat wafers, ball bearings, levers, sliders, etc... What movements of these parts are possible in various states? Are there any pieces that appear irrelevant to our goal of manipulating the lock open such as drill inserts?
Bittings and Keyspace
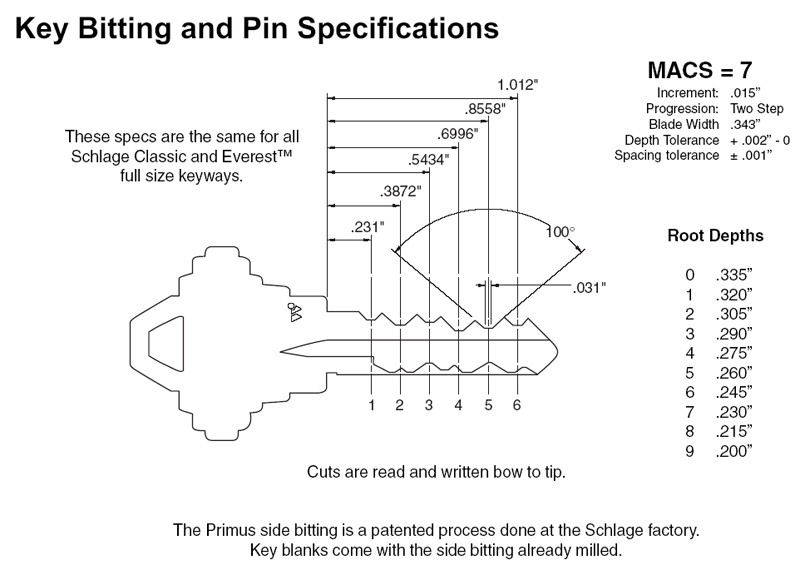
An item that should be considered is the number of bitting possibilities across locks/keys. Is it feasible to brute force the bitting (the combination of key cuts required to open the lock)? Obviously, this should be first approached from the technical specifications and claims of the manufacturer. However, one should not stop there and may find progress by looking elsewhere. Consider the difference between bitting possibilities; it may be smaller than the manufacturing tolerances can accurately discerne. In other words, a bitting height of "2" may also be able to set a "3" pin, for example. This is especially exploitable in locking features with no false gates. False gates are designed to temporarily trap blocking elements (like pins, sidebars, etc..) in the wrong places during manipulation. This usually leads to the sensation of correctly setting that component. False gates can also ruin statistical advantages gained by bitting differences being too small. Also consider that it may be possible for components of a brute force attack to be seperated. An attack on an Assa Twin-like lock (say...6 pin 5-height + 4 pin 4-height sidebar) may seem like an attacker would have to try 6^5 * 4^4 bitting combinations. However, if you could tell when one of these two locking elements is correctly set; it becomes 6^5 + 4^4 which is a considerable improvement. Also think about forms of MACS (bitting limitations between adjacent pins, etc..). It may seem an impossible task to narrow down these bitting possibilities enough to form a realistic attack, but you never know until you try. Also, partial decoding techniques may be combined with limited keyspace to form more complete or even full decoding.
Manual Picking and Feedback
Picking is almost never pointless on even the best of high-security locks. Applying tension (force applied in a manner similar to the action of key upon opening) and feeling around may lead to information. Also, don't underestimate what lots of practice and experience can accomplish with pure picking. Experimenting with picks can give a good picture of how much clearance is present for custom tools. It can also reveal features that may have gone unseen such as the shapes of parts of the keyway. Poking around with various manual tools can provide estimates on the needed strength of eventual tools. It's also possible in some cases to act as a human pin & cam decoder. In mechanisms with many false gates of which one is real, this technique may be the best in terms of manual picking. Basically, you should falsely set all of the pins first; this will lock them in place. Then move from pin to pin feeling for friction while applying tension. Once a binding pin is found, lift it up to the next false gate (or real). This action may require loosening of the tension, but be careful not to undo your progress. If this action is repeated and only binding pins are lifted further, the correct bitting will emerge in many locks.
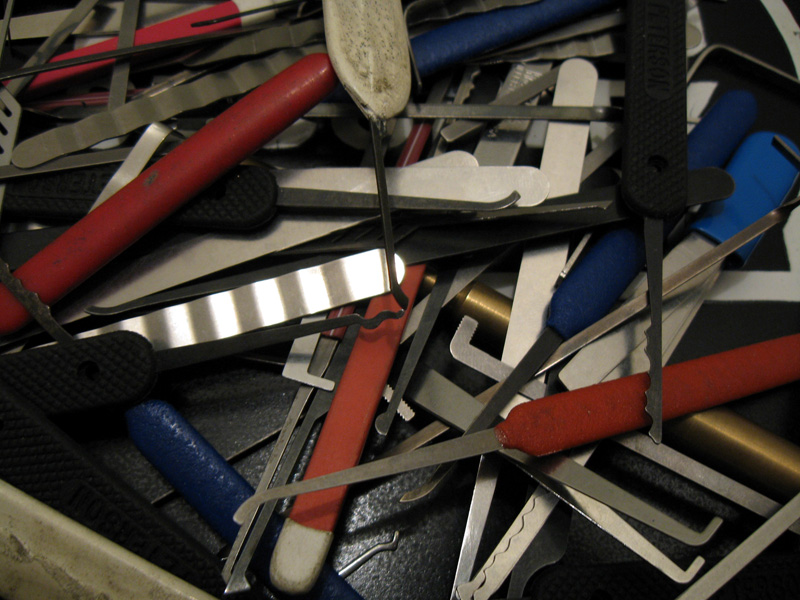
Tool-fitting
This is the term I use that describes the process of figuring out what tool shapes are best for the target lock. You should disassemble a target cylinder and remove every part. Next, get a big pile of picks and differently shaped pieces of metal in front of you and begin experimenting with what tools can fit where. Angle the picks in various ways and figure out what areas of the keyway can be reached. This process should yield some good candidates for further testing. From here, begin adding pin stacks and other elements slowly while testing the maneuverability of the tools; navigating around the tumblers is the chief concern at this point. Once you've narrowed the tool set down to only those that can comfortably move around a fully pinned cylinder, its time to try lifting/moving the tumblers and locking elements. Try this with the plug removed; it will give a good idea of what parts are being moved as you proceed.
As you test the range of pin lifting the various picks can accomplish, don't be so quick to discard the ones that can't give a full lift. Keep in mind the actual bitting limitations of the elements; it may not be necessary to lift the pins/sliders/etc.. until they stop in order to hit all possible bittings. This same freedom also extends to picks that appear to be too thick and may lift the pins simply by being positioned under them. I recommend looking up the specifications or examining a collection of keys to determine the lowest possible bitting. If this lower extreme is still higher than the minimum lift of the candidate tool, it is likely good to go. Now that we have a group of good candidate picks than can maneuver in the keyway and do a decent job at manipulating the pins, try modifying them to work even better. Another excellent option is to use them as a template to create a brand new but similar tool. Once you have this custom picking tool produced, it might be possible to further modify or augment it to increase the amount of successful openings.
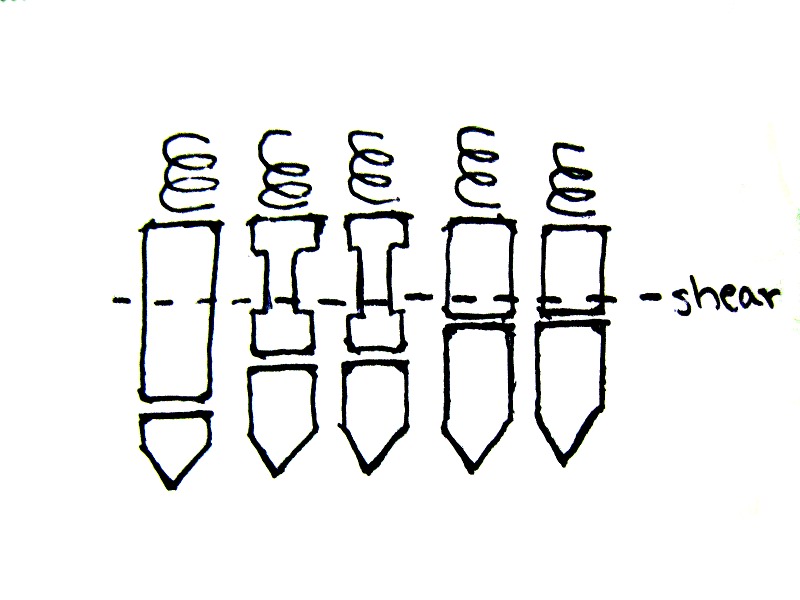
Overlifting Attacks

One attack vector is lifting accessible locking elements further than they are designed to be. The classic example is found in comb picks. Like their name suggests, these are tools that are shaped like combs with the teeth spaced like the pin chambers of the target lock. Barry Wels wrote a good blog post about comb picks and showed how they can even be applied to very paracentric keyways like the Abus Top Security cylinder. Comb picks overlift the pins to a point that both the driver pins and the key pins are above the shear line. This does not work on every lock and good design prevents it. A variation of this attack is to overlift the pins by force until the spring cover pops off; this one is destructive but worth mentioning. When analyzing a lock, also lookout for the opportunity to overlift locking elements that are not so obvious. Eric Michaud discovered that he was able to lift the inner pin stacks of Mul-t-Lock until they caused the outer drivers to simply lift off the outer key pins (creating a large shear line). Matt Blaze documented Michauds MTL Overlift Attack on his website and I recommend you have a look. I have experimented with a similar technique in Medeco in which a wire slips up an open sidebar groove until it presses against the bottom of the driver pin. Further lifting can lift the driver off the key pin leading to a similar large shear line situation.
Mechanical Picking and Decoding
One of the most straightforward style of tools that can be developed for many high security locks is such that it functions likes a freehand pick with its movements restricted in a useful way. The advantage of these sorts of systems is that they virtually eliminate the experience of keyway chaos. The user no longer has to ask themselves "Am I under a pin?", "Am I lifting a pin?", etc... One of the popular tools that does this is H&M's Mul-T-Lock picking tool. It consists of a dimple-lock SPP lifting pick mounted in a barrel inside a tube. The barrel has a set screw which limits the forward movement and rotation of the picking end in relation to the tube in which it rides. These limitations only allow the user to rotate the pick end (and thus lift the pins) when it is centered underneath pins. A similar system may possible for normal pin tumbler locks which would limit when an attached hook pick can pivot to lift. 13 Song makes a series of automotive picking tools which function in a different but similar manner. The restriction of movement in these tools is accomplished inside the keyway. The lifting tool rides inside a cage of sorts that fits inside the keyway; this cage has holes drilled in positions which coorespond to the locations of the wafers. This means that the lifting tool can only do its job when it is positioned under a wafer.
Also realize that the lifting element need not function in a traditional manner; examine other possibilities of manipulating the locking elements. Example: the forward movement of a sloped surface against the pin such that a camming action occurs to precisely lift the pin. An advantage of most of the these mechanically-assisted picking tools is that they are prime candidates for adding decoding capability to. Simply making accurate markings on the relevant parts of the tool in accordance with the manufacturer bitting specs typically enables the tool to decode as well. Typically, the bulkier and more form-fitting you can make the working end of the tool, the more consistent it will be and the user will experience less confusion. In other words, the less freedom a tool designer gives the user while still allowing the tool to function, the easer it will be to use in many cases. The trade-off is that these sorts of tools generally don't work on as many locks or keyways as a more skeletal and freehanded-style tool.
Traps and Overall Awareness

When thinking about ways to compromise a lock, its easy to get lost in the details. This is especially true when a new exploit is found or a breakthrough occurs. Its important to frequently take a step back and look at the rest of the cylinder. Not only can this lead to important discoveries (usually in the form of a "doh" moment), but it will also help with possible problems. For example, you just finished that fancy mechanical picking tool for the Kaba Gemini. Have you stepped back and considered what will happen when you pick it and turn the plug past 45 degrees? Depending on the design of the tool, it may glide right by or it may cause the adjacent drivers to snap down and trap your new tool inside. Just because the manufacturer didn't intend parts of the lock to provide trouble, it doesn't mean that they won't. The prefect example of this is the classic 180 degree problem; picking many pin tumbler locks and turning the plug 180 degrees will cause the drivers to shoot down into the bottom of the keyway.
When dealing specifically with trap pins and similar elements, there are a few tricks that may help. First, using information gathered by your technique/tool to create a key will bypass these features. Also, even if a trapping occurs, it may be possible to lift the trap pin out of the plug and escape. Attackers should also consider plug-spinning options. Predicting the location of the trap and using a plug-spinner to spin the plug very fast may allow you to jump over the trap entirely. Just be aware of any other traps, etc.. in case you go too far. I have also heard of folks packing a picked keyway full of thread to simulate an inserted key and bypass trap pins.
Destructive Attacks

During the analysis of a particular lock we should not completely disregard destructive attacks. My personal definition of destructive is any method that permanently alters any component of the target. This does not necessarily mean that the technique is messy and unsophisticated (brute force). It may even be covert (no immediate evidence of entry until expert inspection). Also consider that the altered pieces may be replaceable after the defeat (and thus making the entry surreptitious). Drilling is a common subcategory here (esp. drilling through the shear line). In some sidebar locks, the plug face may be drillable and allow the sidebar to be pulled right out of the front of the cylinder. Countermeasures against this include: drill protection in the plug, a ball bearing in the end of the sidebar, and sidebar bent 90 degrees on the back end. Drilling a hole may also allow access to parts of the lock that are normally hidden to allow decoding, etc.. One attack on the classic GM sidebar locks used a drilled hole and a tool to depress the sidebar (which is not normally tensionable like most sidebar locks). Also remember that destructive attacks do not need to completely defeat the lock; they may target one feature for example. Sometimes defeating some of the security components (like the pin stacks) will allow excessive tension alone to bypass others. This may bend or crush sidebars, sidepins, profile pins, etc.. or there may just be enough "wiggle room" to allow the metals to temporarily compress and allow the plug to turn. I've often wondered if catching Assa Twin sidepins in their false sets (by applying heavy tension) and then using wedge to forcibly lift them would break off the little shelves on the steel sidebar. In any case, I think that researchers should not ignore clever and creative attack methods just because they are partially destructive to the lock.
Documenting and Notation
So I was toying around with the idea of taking notes while picking in order to deduce more information about the lock. After abandoning my initial ideas about how the notation system should work, I started picking and just writing in a shorthand what came naturally. The notetaking system that resulted is just a base and is meant to remain flexible or even be discarded in favor of another if it works better for the picker. I considered writing this up on the SPP page but decided that it fit better here. There are a few advantages to taking notes while picking a lock that make documenting the process worth considering. You can keep track of binding order and relative pin setting heights. By using both tensioning directions and putting the discovered binding order to the test, you can create a profile of the tolerance errors of the lock. This may lead to a discovery of patterns across a brand or model. The notation that I cobbled together is a shorthand description of how to open the lock as directly/quickly as possible. If a reader used the same tools on the same cylinder while following the note, they would be opening it by SPP in the exact same manner as the individual that wrote the notation. This could lead to productive debate about the speed of the method on the note and how it could be modified for improvement. One can imagine a small group of pickers bouncing thoughts and scribbles back and forth until they converge on the absolute best way to pick that cylinder in a documented and reproducable way. The biggest benefit of trying out notation systems like this is that it really makes you pay attention. I think beginners and experts alike can really improve their pick-fu by giving this stuff a try.
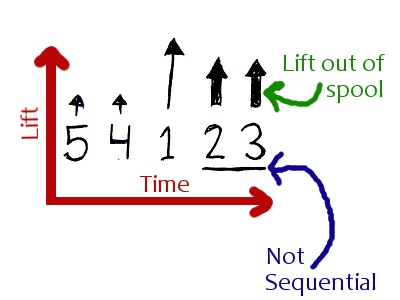
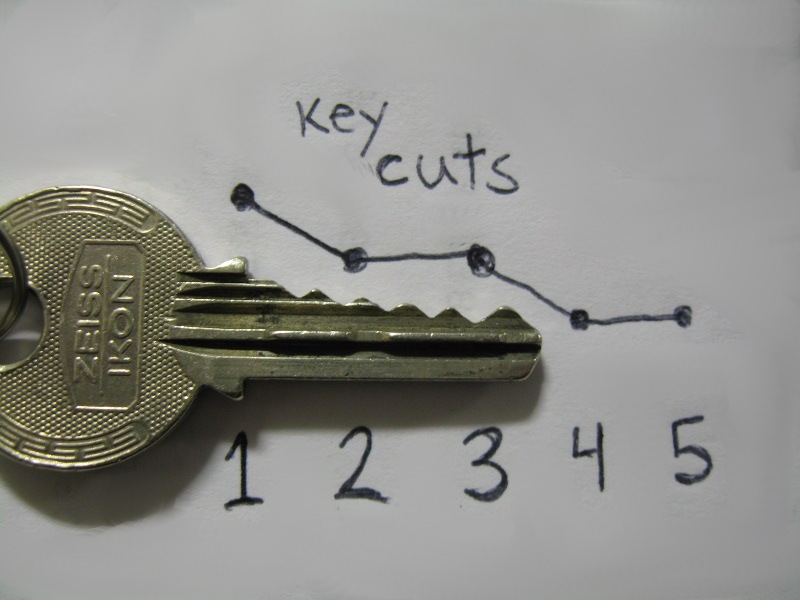
I will describe the system that I came up with and hopefully someone else will make a better one. First, pick the lock while paying close attention to how many pins needed to be set; this will guide further analysis. Now pick it a few more times but pay close attention to which pins you are setting. If you aren't sure, lightly scrape your way forward or back to count the pins and identify the target pin's location. This will eventually yield a binding order which should be written down. Now verify and re-count this written down binding order until you are sure it is correct. Some pins may be written down twice; that's ok, we're just building a base to work from. Next, go back and try swapping some adjacent numbers in the binding order. If the lock still opens, this will give you the pairs/groups of pins that don't need to be set sequentially (underline these sets). Later you can choose the order that leads to the fastest openings within these pairs/groups. Now go back and take note of roughly how high you are lifting each pin as you follow your note to pick the cylinder. Any odd lifting or security pin indicators (backward plug rotation) should be noted. The relative lift heights can be documented as arrows of appropriate lengths extending from the written-down numbers. Special lifts (like suspected spool pins) can be noted by altering the arrows (ex: bold). Now that you have this information written down verify once more and then use it to draw a rough bitting profile. You can even use this information with the security pin info to estimate the shape of the pin stacks. Overall, I like playing with this concept and would enjoy hearing from other experimenters.
Sputniks and Setup Keys
Lets say that you've developed a clever decoding method for a high-security but it is not able to open it. Your technique tells you what the key's bitting is but you are likely far away from the fancy machinery required to cut this key. One solution for this issue is to create a setup key; a device that can simulate a key cut to any bitting. These tools are usually composed of several movable or replaceable parts that can be configured to the shape of a target key bitting. Sometimes, these setup key kits are even produced by cutting up real keys into pieces that can assembled like Legos (ok well maybe not that easily). Other times, it may be possible to only adjust the positions of pieces on the setup-key to vary the simulated bitting.
The ultimate style of setup key is one that can have its bitting adjusted while still inside the lock. This allows the operator to try things like picking without concern for losing set pins when releasing tension. It may also allow for variations of impressioning and reverse picking (setting a pin by lowering rather than raising it). Tools like this exist and are typically not classed together but I tend to group them. The most recognizable example is the pin tumbler decoder-pick called the Sputnik (the shape gave the tool its name). It consists of a heavily modifed keyblank that allows a series of wires to be extended and retracted from its bitting cut postion to press that pin up. The user is able to individually adjust the level of each pin by pressing/pulling a small control plunger connected to its respective wire. Another tool like this has been nicknamed the Centipede (also because of its shape). It is a decoder-pick for the Ford Tibbe (wafer lock operated by a disc-lock style of key) with multiple segments (one for each wafer) that can be rotated to any position by its cooresponding control handle. This could only be accomplished by nesting many concentric tubes inside each other to form the core of the tool.
Designing setup keys and Sputnik-ish tools requires you to really pay attention to the tool fitting aspect of the lock. If there is not enough room for one solution, try removing some excess metal and using a different orientation; examine the key for reference. For a hassle-free way to keep pieces of a setup key together, look into magnets. Refrigerator door sheet magnet material really worked for me while I was building a Schlage Primus sidebar setup key. Another one I tried was epoxying a wire to the underside of a key piece to allow insertion and removal of it.
Case Study: Mul-T-Lock

It is on this page that we will break down the Mul-T-Lock Interactive and attempt to find vulnerabilities. Follow along as I try to find breaks in the design of this neat little cylinder. As with the other pages here, if this page updates; the home page will list the update. Also, if you have a thought or idea; please email and let me know.
Component Binding

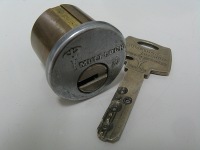
One of the first things to consider when experimenting with a new lock is the binding order of the various components. Normal pin tumblers typically have a random binding order tending toward back-to-front depending on wear. More complex mechanisms may have more elements than a row of pins. Figuring out the order in which these pieces bind is critical to decoding or opening the target. One should examine every component that directly or indirectly blocks the rotation of the plug and guess which tolerances are closer based on the design. Next verify your hypothesis with experimentation; try removing some of the pieces and then adding them back to determine the binding order.
We'll use the Medeco m3 as an example to demonstrate what this means. The most obvious blocking element is the pin tumblers themselves. They block plug rotation directly at the shear line. This direct-blocking is good hint that the shear line will always bind first. The other direct-blocking component is the sidebar. It does not directly stop plug rotation on its own, however. There are two additional mechanisms that block the sidebar from retracting when tensioned. The first is the sides of the rotating pins; they must be rotated such that the sidebar gates line up with teeth on the sidebar. The second mechanism that blocks the sidebar is the slider; it must be pressed forward the correct distance to line up with a gate in the sidebar. There are several factors that determine whether the sidebar or the shear line bind first. The first is the shape of the sidebar/shell interface. The steeper the angle here is, the "faster" the sidebar will be pressed inward when tensioned. The second is the distance between the sidebar teeth and the pins' sidebar gates or slider (whichever is smaller). When these factors are compared to the pin chamber tolerances, you can determine whether the sidebar or shearline will bind first.
The shape of the Medeco sidebar/shell interface is not symmetrical. The angles are such that when tensioning clockwise, the sidebar is pressed inward "slower" compared to the tension applied. This gives the pins "time" to bind first. Tensioning counter-clockwise causes a faster inward advancement of the sidebar and makes it bind first. In the m3, I've found the slider to bind after the pins/sidebar. A good way to test this is to remove the plug and press the sidebar with your finger. Next try to move the slider and see if it binds regardless of pin rotation. Simple tests like this will give you pieces of information that may help put the puzzle together.